• Skip to main content
  • Skip to primary sidebar
  • Home
  • Me
  • Eat
  • make
  • Pie
  • Contact
  • Go
  • Misc.
  • architecture
Architect Mom

Architect Mom

Drafting a life

Architect Mom’s Rustic Bench

by Joan Robinett Wilson on November 5, 2011

two big boys on the bench

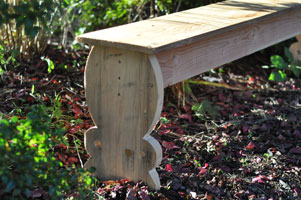
I like woodworking. I’m not very good at it, but I like it. In architecture school I had a woodworking class and was assigned the bandsaw for the whole quarter. I became one with the bandsaw and am pretty comfortable with it. At home I have a table saw, a compound miter saw, a small bandsaw, a drill press and a router that I don’t know how to use. I’m much better at envisioning something and figuring out how it goes together than actually creating it. Honestly, my craftsmanship sucks. But I can do some very basic things. I’ve made this bench several times for different auctions I’ve been a part of. It is my “rustic” bench – emphasis on “rustic”. It’s pretty easy to make and the more flaws, the better, as it is “rustic”. The hardest thing is cutting the legs in the pattern. It doesn’t work to use a tabletop band saw or jig saw to cut out the 2×12 legs- I know this as I did try. You need a sturdy router that can cut through 2x material or a handy friend with one that can cut it out for you. The leg pattern is attached here [bench leg pattern] . Better yet, come up with your own leg pattern. The rest, I think, you can do on your own.

I have drawn up a plan [ bench plan  ] for you to use and I will lay out the directions here, also.

1. Cut out the legs from a 2x12 using the pattern. Cut the 5'-1" long brace from a 2x8. Cut a 6'-0" seat from a 1x12.
2.Drill pilot holes in the legs and the brace for the 3" screws. Make sure they align and are centered on the leg.
3. Attach the legs to the brace. I do this by flipping everything upside down so that the top of the brace and top of the legs are flush on the floor and attach them then. Fill the screw holes with putty and sand if you desire perfection. Mine are "rustic" so I skip this step.
4. Center and attach the seat top to the legs and brace with 4d nails as shown on the plan. (3) at each leg and (5) along the brace. Fill the holes with wood filler and sand, if desired.
5. Almost done. I give it a couple of coats of paint now and top it with a coat of polyurethane.
Print Friendly, PDF & Email

Filed Under: furniture/ woodworking, make Tagged With: bench, furniture, make, rustic

Reader Interactions

Leave a Reply Cancel reply

Your email address will not be published. Required fields are marked *

Primary Sidebar

Snohomish, WA is where you’ll find me, architect mom, ”drafting a life”; working from home as an architect, managing my family’s lives, forgetting to clean the house, building some crazy thing or another, sometimes cooking a great meal and always packing my kids horrible lunches.

Categories

What do you want to find?

Archives

Favorite Do It All Links

  • Joyworks Shopgirl
  • Katy Elliott Blog
  • Ruffles and Roses
  • Sweet Paul Blog

Favorite Eat Links

  • A Southern Fairy Tale
  • First Look, Then Cook
  • Scrumptious Blog
  • Smitten Kitchen
  • Stasty
  • we[heart]food
  • What Katie Ate

Favorite How On Earth to Take Pictures and Make a Blog Links

  • Clare Barboza, photographer and artist
  • Oh My Stinkin Heck Blog

Favorite Make Links

  • Ana White blog
  • MADE
  • mmmcrafts
  • think liz.

Recent Posts

  • Introducing My New Favorite Bar Cookies: Louise Cake and Lemon Almond Bars
  • Blimey, Eat Your English Tea Sandwiches!
  • Sweet Potato Salad- Yes it’s Healthy….But, it Actually Tastes Amazing
  • Lucky Seahawks Pie with Fortune Cookie Crust aka Blueberry Cream Pie. Go Hawks!
  • Getting Rid of the Pudge with Fresh Vietnamese Lemongrass Chicken Satays and Cucumber Salad

Copyright © 2025 · Magazine Pro on Genesis Framework · WordPress · Log in